Follow the steps below to collect your measurements and start building a hinged screen door.
Before you start
Important
Please view the available videos and follow the instructions carefully. Please also take note of the required deductions. We do not apply any deductions to the final measurements on your order confirmation or approved quote — the measurements you submit will be the exact ‘make size’ we manufacture to. All measurements must be taken from the outside, looking in. Measure exactly where the product will be fitted, to the millimetre.
If you have any questions at all, please don’t hesitate to contact us.
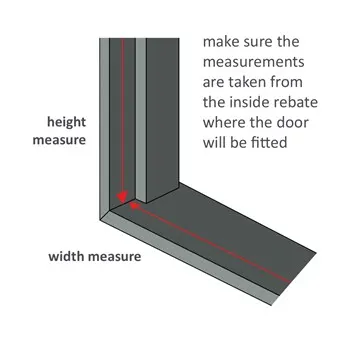
Check your Rebate
Review the below diagrams to confirm you have room a screen door.
 rebate diagram
 rebate diagram 2
If you have any questions at all, please don’t hesitate to contact us.
Option 1: Measure your existing screen door
Measuring from an existing screen door: If you have an existing door, and you are happy with the fit then we suggest that you measure this door and use these measurements for your new door.
Lock Side: THE LOCK SIDE IS DETERMINED FROM THE OUTSIDE LOOKING IN
Door Widths: Measure the top, middle and bottom widths of the screen door; send us all three measurements.
Door Height: Measure from top to bottom of the screen door on both the left and right hand sides; send us the shortest of the two measurements.
Lock Height: You can use the existing lock hole cut out if desired; first make sure that the new handle will not interfere with the existing solid door handle, do this by referring to the Lock Above & Lock Below instructions at the bottom of the page. Then measure from the bottom of the existing screen door up to the centre of the existing striker, this will be the centre of the new striker and screen door handle.
Note: All FLY range doors are supplied with a latch that is installed by the customer onsite when fitting the door.
Option 2: Measure from the door jamb for a new door
Door Width: Measure the top, middle and bottom of your door frame (1.1), deduct 8 mm for a single lock and 9 mm for a triple lock from each, record these measurements.
 1.1
1.1Door Height: Measure from top (1.2) to bottom (1.3) on both sides of your door frame, deduct 8 mm from the shortest side and record this measurement. Keeping the sides the same length will allow us to build your door square.
 1.2
1.2 1.3
1.3Note: A bug seal is recommended to minimise gap at the bottom after the door is installed. This can be selected from the list of Addonsns at Step 3 in the Product Builder; this will be colour matched to the frame.
 1.4
1.41.5
Lock: Stand outside, close the main solid door. Establish whether you want the new lock on the left or right hand side, then if you want the new lock above the existing door handle or below.
Lock Above: Measure from the bottom sill to the top of the existing solid door handle and add 125 mm (1.4). This will be the new door handle and tongue height.
Lock Below: Measure from the bottom sill to the bottom of the existing solid door handle and deduct 60 mm (1.5). This will be the new door handle and tongue height.
 1.6
1.6If you have an existing lock hole (1.6) from a previous door and you are confident that this has clearance from the existing lock, based on the Lock Above & Lock Below guidelines, then measure from bottom sill to the centre of the lock hole and deduct 4 mm. This will be the handle height. The centre of the lock tongue is the centre of the handle.
Note: All FLY range doors are supplied with a latch that is installed by the customer onsite when fitting the door.
THE LOCK SIDE IS DETERMINED FROM THE OUTSIDE LOOKING IN
 rebate diagram
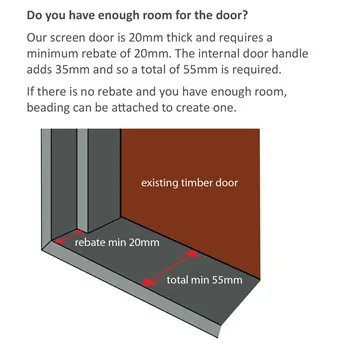 rebate diagram 2
 1.1
1.1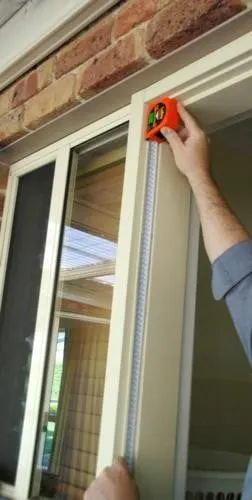 1.2
1.2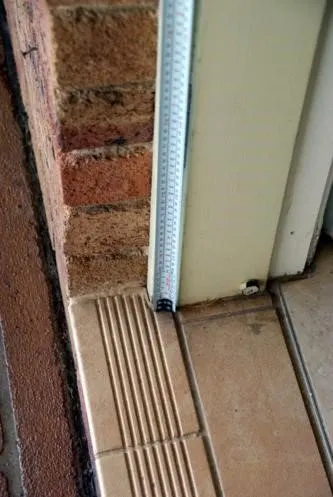 1.3
1.3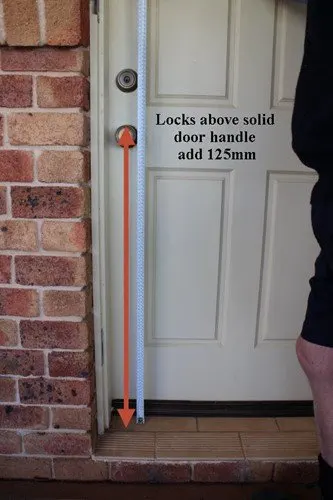 1.4
1.4 1.5
1.5 1.6
1.6