Please view all our videos and read through guides provided before proceeding with your installation.
Tools - you will need:
Cordless Drill
Phillips Driver Bit
6.5 mm Drill Bit
3 mm Drill Bit
Pencil or removable marker
Phillips head screwdriver
Timber fit: 8 gauge screws for hinges
Aluminium fit: 3/16 countersunk rivets for hinges
Note: If you require a bottom bug seal, it should be installed last.
Step 1. Swinging the door
Hold the door in the open position 4-6 mm down from the top of the jamb with the hinge open and resting against the jamb, mark the centre of the elongated hole in the top hinge.
 Install 1.1
 Install 1.2
 Install 1.3
Using a 3 mm drill bit, slightly pre-drill a pilot hole on the mark you have just made. Hold the door in place and using a cordless gun, screw through the centre elongated hole into the pilot hole and screw up tight. Repeat the same process using the centre hole of the bottom hinge. Now close the door onto the jamb and stand outside. Adjustments up and down can be made now if necessary by loosening the two screws. Once you are happy with the doors position, pilot drill and fix all remaining screws to the hinges.
Note: Seconline FLY and DIAMOND + FLY hinged screen doors are supplied with two hinges only, unless there is a triple locking system fitted in which case we will add a centre hinge.
Step 2. Install the screen door latch
Your screen door latch will consist of the following:
Screen door latch
Screen door knob
Spindle
Metal thread screws x 2
Self-tapping wood screws x 2
Striker plate
Template
With the screen door closed, use the template provided to mark three hole positions on the lockside of your screen door frame at a height clear of the main door knob.
Note: Hole positions must be accurate, so double/triple measure!
Drill 6.5mm holes straight through the door frame using the three marked hole positions.
Place the latch on the inside of the door frame, slide the spindle through the pre-drilled centre hole, then position the knob on the outside of the door frame by sliding it onto the other end of the spindle. Using the two metal thread screws, secure the latch, knob and spindle together.
Close the screen door up to the door jamb, standing outside, mark the centre of the knob with a pencil or removable marker on the door jamb. Open the door, line up the centre of the striker plate with your mark on the door jamb, then screw the striker plate to the door jamb using the two self tapping screws provided.
Step 3. Installing the Bug Strip
The installation of a bug seal/strip is done after the door is installed to ensure a perfect fit. Remove the adhesive tape and apply it to the bottom of your door. For added strength fix with pop rivets or screws.
Allow the seal to rest on the bottom of the door resting on the sill. Do not push down. Using a 3 mm drill bit (1/8 imperial) drill a hole through the top section of the bug seal and directly into the bottom of the door. Pop rivet and repeat at the opposite end.
 Install 1.1
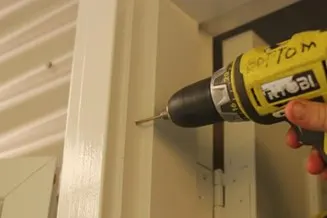 Install 1.2
 Install 1.3