PREFER A FREE QUOTE FOR MEASURE & INSTALL?
Videos
Please view all our videos and read through guides provided before proceeding with your installation.
Tools - you will need:
10 mm Chisel
Hammer
Cordless Drill
Phillips Driver Bit
3 mm Drill Bit (1-8 imperial)
Pencil
Timber fit: 8 guage screws for hinges
Aluminium fit: 3-16 countersunk rivets for hinges
Note: If you require a bottom bug seal, it should be installed last.
 Hinged Lock Install
IMPORTANT:
When assembling and installing your lock the snib (the silver lever used to lock and unlock the door without the key) must be in the 12 o'clock position - if this is not installed correctly to your locking mechanisms will not perform correctly.
If you have ordered a “Push 2 Go” hinged door lock, the Locking Hub must first be rotated so that the pip is closest to the door edge.
Step 1. Swinging the door
Hold the door in the open position 4-6 mm down from the top of jamb with hinge open and resting against the jamb, mark the centre of the elongated hole in the top hinge.
 Install 1.1
 Install 1.2
 Install 1.3
Using a 3 mm drill bit, slightly pre-drill a pilot hole on the mark you have just made.
Hold the door in place and using a cordless gun, screw through the centre elongated hole into pilot hole and screw up tight. Repeat the same process using the centre hole of the bottom hinge. Now close the door onto the jamb and stand outside. Adjustments up and down can be made now if necessary by loosening the two screws. Once you are happy with the doors position then pilot drill and fix all remaining screws to the hinges.
Note: Seconline FLY and DIAMOND + FLY hinged screen doors are supplied with two hinges, unless there is a triple locking system fitted in which case we will add a centre hinge.
Step 2a. Fixing the lock - Single lock instructions
Whilst holding the door in the open position, push the round trigger on the main lock to extend the tongue into the locking position.
Close the door up to the jamb and mark above and below the tongue.
Now open the door and use the striker plate as a guide to trace the two holes and the rectangle tongue hole onto the jamb, using the marks as a guide.
IMPORTANT: The round trigger does not go into the main tongue hole. It is designed to trigger the main tongue only and must not go in main tongue hole. It should slide just above the hole and stay in the depressed position on the main striker face.
2.1
Using a 3 mm drill bit, pilot drill the two screw holes. Then ribbon drill the complete outer area of the tongue hole (2.2). Using a 10 mm wood chisel and hammer, extract timber to make the hole needed for the main tongue (2.3). Make sure that this hole is cleaned out completely and that no tongue restriction remains.
 2.2
2.22.3
Step 2b. Fixing the lock - Triple lock instructions
Whilst holding the door in open position push the round trigger on the main lock so the tongue extends into the locking position. Using the key, lock the door, all three tongues will be in the exposed lock position.
(PLEASE NOTE: The two vertical strikers; one from the underside of the bottom tongue and the other from the upper side of the top tongue).
Close the door up to the jamb and mark above and below all three tongues including the vertical strikers on top and bottom tongues.
4.1
Now open the door and use the striker plates as a guide to trace the two holes and the rectangle tongue hole onto the jamb using the marks as a guide for all three tongues. Make sure you give clearance for the two vertical strikers.
Using a 3 mm drill bit, pilot drill the two screw holes on all three-striker plates. Then ribbon drill the complete outer area of the tongue holes. Using a 10 mm wood chisel and hammer, extract timber to make the holes needed for main tongue and top and bottom tongues. Make sure that all holes are cleaned out completely, and that no tongue restriction remains.
Now fix main striker plate into position as well as the top and bottom plates with the screws provided. Re-check the door is now locking in both open and closed positions with the same non-restricted action, also check that it is deadlocking the internal snib when locked with the key.
Close the door and using the key lock the door. If the lock hole has no restriction then it should lock effortlessly. Now go inside and repeat this process. This action should deadlock the internal snib, if it does not then there must be a restriction and it will have to be removed.
Fix the main striker plate into position with the two screws provided. Complete the Simple Lock Check to ensure the door is now locking in both open and closed positions with exactly the same non restricted action, deadlocking the internal snib when locked with the key.
Step 3. Simple Lock Check
Use the following method to ensure lock is operating correctly:
Open the door, pull down on the handles and release.
Without touching the door handles, depress the small round trigger above the main tongue, this will allow the main tongue to fully extend, this is the correct lock check position for your lock.
Without touching the door handles, use the internal snib to engage the lock. In the case of 3-point locks the top and bottom strikers will also extend. Do this several times to gain the appropriate feel of how the lock should correctly engage without restriction.
Close the door and without touching the handles repeat the process. If you do not feel the identical sensation of the lock then you have a restriction.
If you have a restriction you must inspect the lock holes to find and then clear the obstruction, test and retest until the door locks with the same feel both open and closed.
Step 4. Installing the Bug Strip
The installation of a bug seal is done after the door is installed to ensure a perfect fit. Remove the adhesive tape and apply it to the bottom of your door. For added strength fix with pop rivets or screws.
Allow the seal to rest on the bottom of the door resting on the sill. Do not push down. Using a 3 mm drill bit (1-8 imperial) drill a hole through the top section of the bug seal and directly into the bottom of the door. Pop rivet and repeat at the opposite end.
 Hinged Lock Install
 Install 1.1
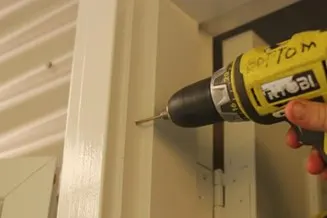 Install 1.2
 Install 1.3
 2.1
2.1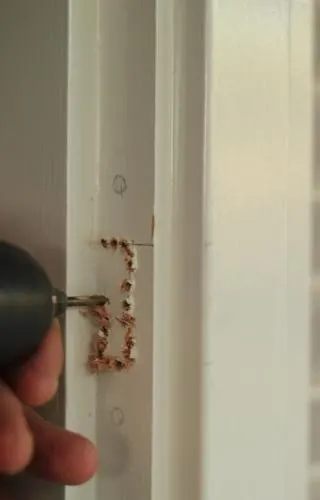 2.2
2.2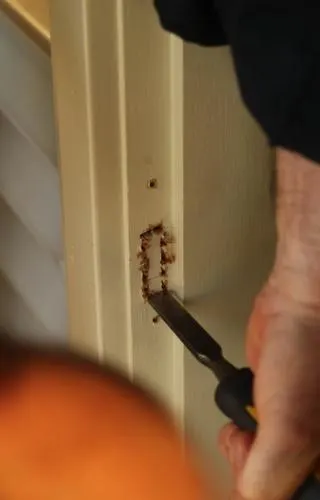 2.3
2.3 4.1
4.1