PREFER A FREE QUOTE FOR MEASURE & INSTALL?
Videos
Please read through guides provided before proceeding with your installation.
Tools - you will need:
10 mm Chisel
Hammer
Cordless Drill
Phillips Driver Bit
3 mm Drill Bit (1/8 imperial)
Pencil
Safety Glasses
Ear Plugs
Masonry Drill (if required for bottom flush bolt)
Timber fit: 8 guage screws for hinges
Aluminium fit: 3/16 countersunk rivets for hinges
Note: If you require a bottom bug seal, it should be installed last.
IMPORTANT: When assembling and installing your lock the snib (the silver lever used to lock and unlock the door without the key) must be in the 12 o'clock position - if this is not installed correctly to your locking mechanisms will not perform correctly.
 Installing a hinged screen door
Step 1. Swinging the Non-Active Door
Begin by carefully unpacking your doors and installing your lock handle; see note above referring to the correct snib position when assembling your lock.
Starting with your non-active door hold the door in the open position with hinge open and resting against the jamb.
Hold the door approximately 4-6 mm down from the top of jamb and mark the centre of the elongated hole in the top hinge (1.1).
Note: Seconline FLY and DIAMOND + FLY hinged screen doors are supplied with two hinges, unless there is a triple locking system fitted in which case we will add a centre hinge.
 Install 1.1
 Install 1.2
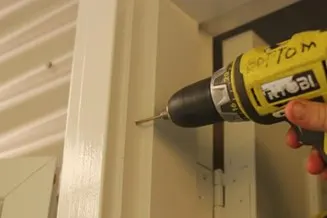
Using a 3 mm drill bit, slightly pre-drill a pilot hole on the mark you have just made (1.2).
Hold the door in place and using a cordless gun, screw through the centre elongated hole into pilot hole and screw up tight. Repeat the same process using the centre hole of the bottom hinge. Now close the door onto the jamb and stand outside. Adjustments up and down can be made now if necessary by loosening the two screws. Once you are happy with the doors position then pilot drill and fix all remaining screws to the hinges.
 Install 1.3
Step 2. Swing the Active Door
Repeat all steps for the Active door and close against the Non-Active door, check your locks by engaging the internal snib. If you find that the locks do not align your doors do not meet to your satisfaction use the included hinge packers to pack out the hinge on one door only.
Note: Ensure that the locks are engaging and locking correctly before you proceed to the next step. Once you have identified that the lock is locking correctly and aligned, then install all remaining hinge screws.
Step 3. Flushbolts
On the non-active door face you will find a silver lever that activates the flush bolts. Pulling down on this lever will engage
Tip: Use something colourful yet removable such as white out boot polish to cover the tip of the flush bolt to mark precisely where to drill the hole.
Close the non-active door to its final close position and activate silver lever, carefully marking both sides of bolts top and bottom. Open the door back and carefully drill a 9 mm hole in both marked positions then close the non-active door and check that flush bolts are engaging fully. Once you are comfortable that there is no restriction and the bolts both top and bottom are engaging easily, then close the active door and check all clearances.
Step 4. Installing the Bug Strip
The installation of a bug seal/strip is done after the door is installed to ensure a perfect fit. Remove the adhesive tape and apply it to the bottom of your door. For added strength fix with pop rivets or screws.
Allow the seal to rest on the bottom of the door resting on the sill. Do not push down. Using a 3 mm drill bit (1/8 imperial) drill a hole through the top section of the bug seal and directly into the bottom of the door. Pop rivet and repeat at the opposite end.
 Installing a hinged screen door
 Install 1.1
 Install 1.2
 Install 1.3